If you too are one of them then you can go through this guide to swipe to delete email instead of archive on iOS Mail app. Making Archive as the default option doesn’t mean that delete is removed. You just need to configure the below settings to switch to Delete Mail as the default option. So, let us get on with it. Also Read: How To Email More than 5 Photos At Once From iPhone
Swipe To Delete Email Instead Of Archive On iPhone
Note: The steps and screenshots used here are from iOS 12.2.
1 Swipe To Delete Email Instead Of Archive On iPhone1.1 What’s the Difference Between Delete And Archive?1.2 Get Archived Mail Back In Your Inbox1.3 Conclusion
Open Settings on your iPhone and select Passwords & Accounts.
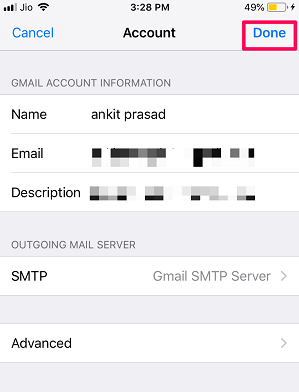
Next, select the email account for which you want to change the archive to delete. After that, tap on Account at the top.
Under Account Settings, select Advanced.
In Move Discarded Messages Into section select Deleted Mailbox instead of Archive Mailbox.
To save the changes, tap on Account at the top left to go back and select Done at the top right corner in Account screen.
This will do the trick. Head over to the Mail app and select the email account for which you configured the above settings and swipe left on any Email. Voila! You will see the Trash or delete option.
You can use the same steps to switch to swipe to delete email for other accounts added to the iOS Mail app if desired.
What’s the Difference Between Delete And Archive?
So basically, when you delete a message or conversation from the inbox of your email account, it gets deleted for good. Which means you will not be able to find that deleted conversation on your email account ever. It’s a good option to remove spam or irrelevant messages from piling up in your inbox. On the other hand, when you archive a message it does get removed from your inbox, but it’s not deleted from your email account. You can find the archived messages in the All Mail section under the settings option of your email account. Archiving messages come in handy when you are done with an important email and want to remove it from your inbox without deleting it. Since now you know the basic difference between the Delete and Archive options, you can now take relevant action on your mails. But now a question may arise how can one get archived mails back in there Inbox. If you too have this query then you can follow the method given below to exactly know how you can do the same.
Get Archived Mail Back In Your Inbox
Once you have archived an email you can still get it back in your Inbox if you want, by following the steps given below.
Open Mail app on your iPhone. Log in if not already logged into your account. Now tap on the Mailboxes at the top left corner.
Scroll down and tap on All Mail. Now find the archived email and tap on it to open.
Note: If you have added multiple accounts to the Mail app, then go to the All Mail of that particular account only from which you have archived the email. 3. Once the email opens, tap on the folder icon at the bottom(second from left). 4. Now select Inbox to transfer this message from the archive to your inbox.
With this, you have transferred the archived mail back to your inbox. Now you can go back to find the unarchived email in your inbox. Also Read: How To Quickly Trash All Emails On iPhone
Conclusion
We hope you were able to swipe to delete instead of archive on your iPhone from the Mail app. Archiving or deleting emails is one’s personal choice, but, one should keep in mind that if you delete an email then it is removed from your account for good. However, if you archive an email then you can get it back to your inbox from All Mail. Therefore it is recommended to read the email carefully before taking action whether to delete or archive it. So that you don’t delete an important mail or archive spam emails. If you liked the article then you can share it with your friends so that they also benefit from this. Save my name, email, and website in this browser for the next time I comment. Notify me of follow-up comments via e-mail.
Δ


![]()